
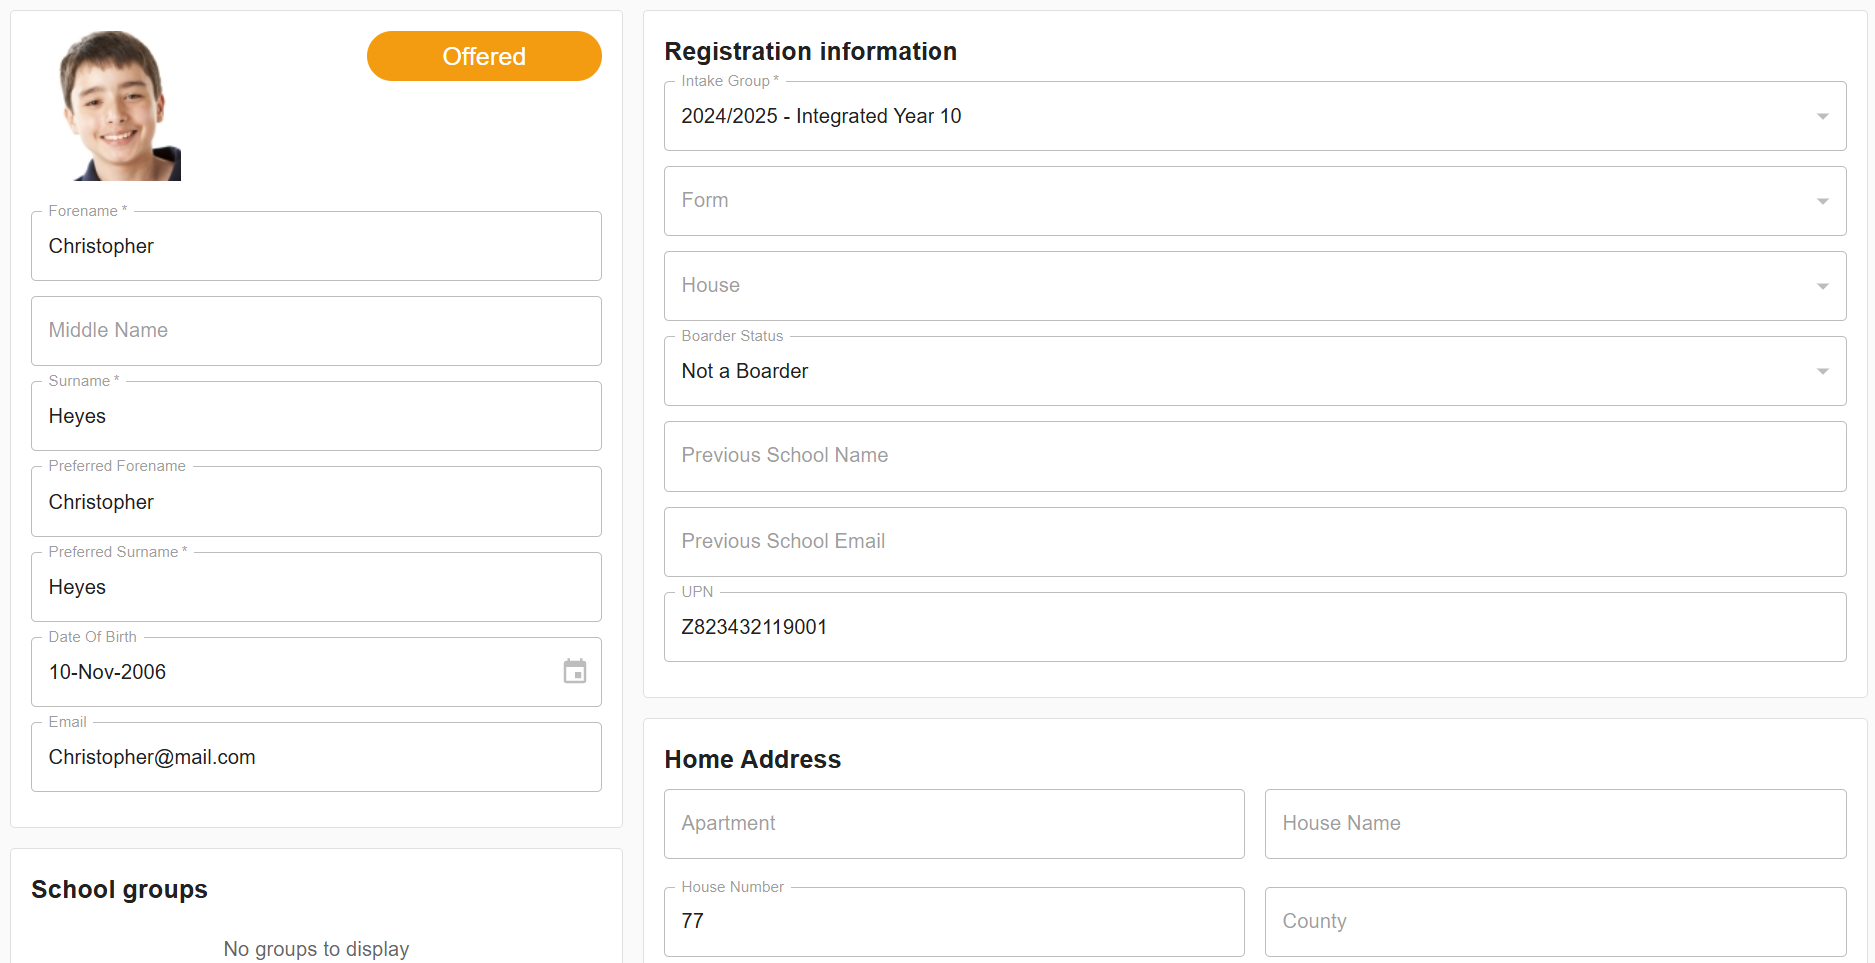
The Student Profile page contains detailed information about the student that is available for parents and the school to edit. The red message at the top of the page shows the list of profile sections that still require confirmation.
Menu #

Basic #
This section contains the student’s personal details and educational information. For new applicants, this information is captured and imported from the Application Form and creates a new Applicant Record in SIMS.
Contacts and Cultural Information #
This section includes details about the student’s contacts and cultural background.
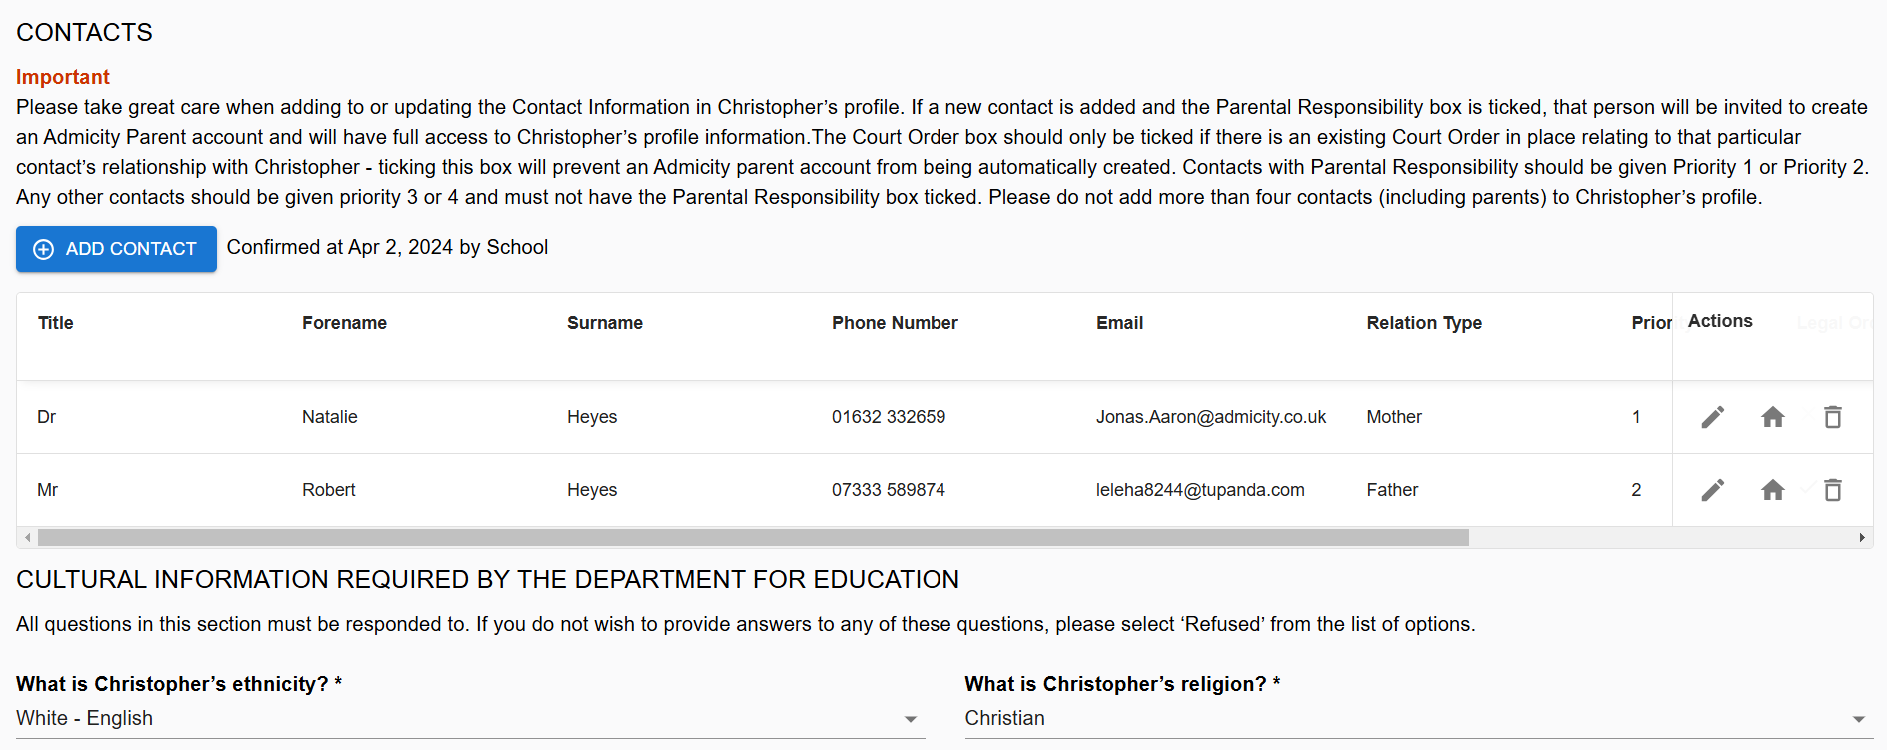
The Student Contacts section is essential for maintaining and accessing the contact information of individuals related to a student. This guide will help you navigate and manage the contacts effectively.
Contacts can also be added or updated in the Student or Applicant Record in SIMS and this information will sync into the Admicity Profile. Please note that Admicity Parent Accounts will only show the account holder their own contact information. They will be able to see the names of other contacts and whether or not they have parental responsibility, but will not see any telephone, email or address information.
Overview #
The Student Contacts section allows you to, Add new contacts for the student, View existing contacts and their details, and Edit or delete contacts as needed.
Adding a new contact in Admicity #
To add a new contact, follow these steps:
Click on the “Add Contact” button, located at the top left of the contacts section, this button opens a form to enter the details of a new contact.
Fill in the required fields such as Forename, Surname, Phone Number, Email, Relation Type, Priority, Parental Responsibility and Legal Order. Each field is described below:
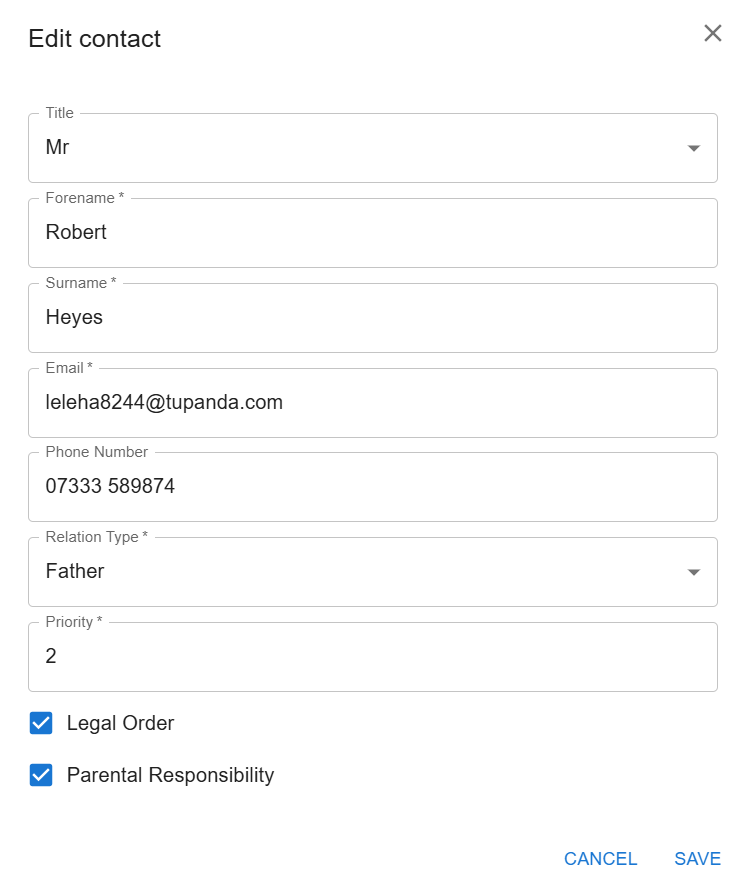
Forename: The first name of the contact person.
Surname: The last name of the contact person.
Phone Number: The contact person’s phone number.
Email: The contact person’s email address.
Relation Type: The relationship of the contact person to the student (e.g., Mother, Father, Guardian).
Priority: The priority level of the contact (e.g., 1 for primary contact, 2 for secondary contact).
Parental Responsibility: Indicates if the contact has legal parental responsibility for the child. If this box is not ticked, the contact will not receive an automated invitation to create an Admicity Parent Account.
Legal Order: Indicates if the contact person has a court order in place relating to his/her relationship with the child. If this box is ticked, the contact will not receive an automated invitation to create an Admicity Parent Account.
Save the Contact: Once all the details are filled in, click the save or confirm button within the add contact form to save the new contact.
Confirming Contacts: The “CONFIRM” button at the top right of the section is used to confirm the current list of contacts. Ensure all contacts are accurate and up to date before confirming.
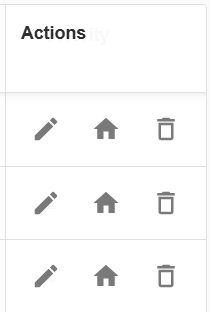
Actions Column #
The actions column includes the following icons for each contact:
Edit Icon (Pencil): Click this icon to edit the contact details. Make necessary changes in the form that appears and save the changes.
Home Icon (House) : Click this icon to edit the contact home address.
Delete Icon (Trash Bin): Click this icon to delete the contact. Confirm the deletion in the prompt that appears.
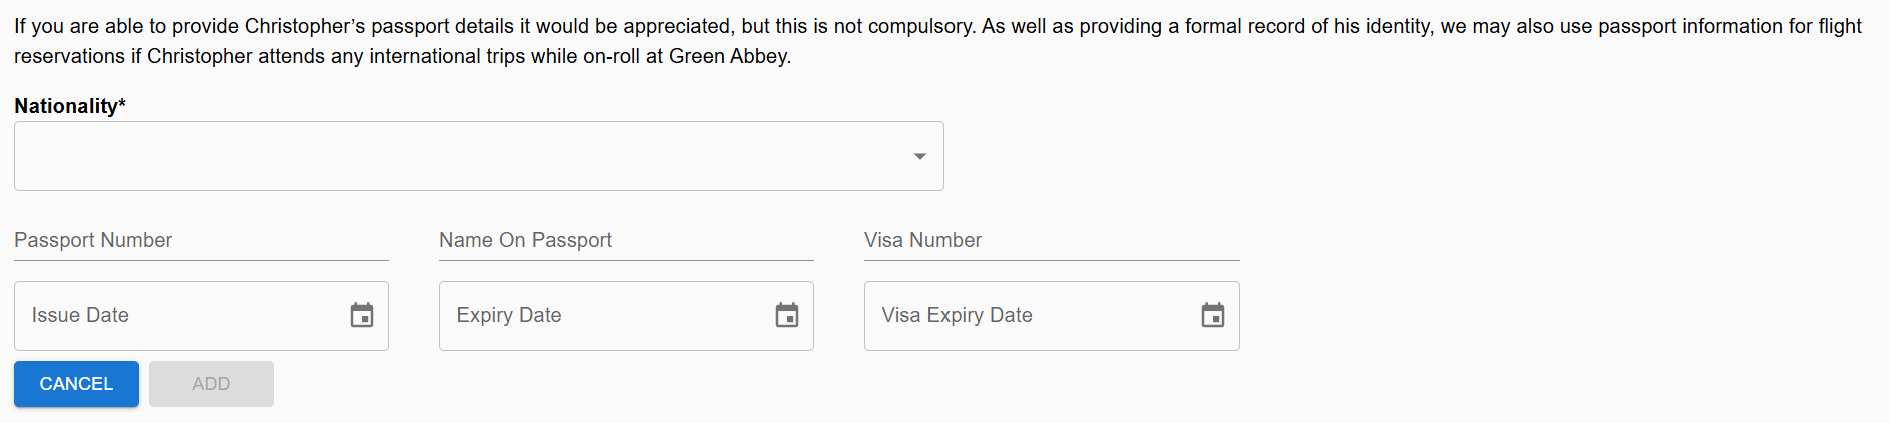
Adding Passport #
If your child has a passport please add it as this will help the school streamline processes for documentation. Click on the “Add Passport Details” button and enter the details. Press the “Add” button to confirm and then press “Save” in the bottom right-side corner.
Medical #
The Medical tab in the student profile is essential for storing and managing student medical information.
Because Admicity uses the Medical Conditions and Medical Events lookup lists from the school’s SIMS, it is important to make sure that these lists are properly maintained, with no duplicates. It is also a good idea to keep the list manageable by not including medical conditions that are not relevant to any current student. Checking and maintaining the lists can be done quickly and easily in SIMS by going to Tools/Lookups/Maintain.
Displaying the school’s own SIMS lookup lists means the parent cannot select a condition or event that is unable to sync.
Medical Condition lists should not contain temporary illnesses, as these are covered in Medical Events. They should also not include any S.E.N. conditions that do not require medication as these will be covered in the S.E.N. section.
The Medical tab is divided into the following sections:
Medical Conditions – used to document any medical conditions the student has, or to confirm that they don’t have any medical conditions. There is also the option to inform the school of any suspected medical conditions that have not yet been formally diagnosed. One of these three checkboxes must be ticked. Only formally diagnosed medical conditions should be entered into Admicity as they will be synced into SIMS. Evidence of the diagnosis and/or management of the condition must be uploaded if any box is ticked on this list. When a medical condition syncs into SIMS, the uploaded documentation will also appear in SIMS, as a linked medical document. Selecting the option ‘Other’, and providing information in the summary box that appears beneath it, will inform the school if their child has a medical condition that does not appear on the list so that it can be created if necessary. Unless the school wishes to Hide this section from parents, using the Manage Access panel, it is important to be aware that any medical condition and associated documents already on SIMS will sync to the Admicity profile, and the parent will be asked to confirm that the information is correct.
Medical Events – used by the parent to inform the school of any significant medical events that the school need to be aware of (for example, an accident resulting in a broken limb that took place outside of school hours) or an illness that requires absence from school. This field is also used by the school to inform parents of any medical events that occur during the school day. Unless the school wishes to Hide this section in their Manage Access panel, it is important to be aware that any medical events already on SIMS for on-roll students will be visible to parents and the parent will need to confirm that they have seen this information.
Medical Notes – used for the parents to inform the school of anything related to the student’s health and medical care that does not come under the Medical Conditions or Medical Events categories. This section can also be used by the school to inform parents of any medical notes relating to their child that do not come under the Medical Condition or Medical Events categories. Both school and parent users should take care to ensure that very sensitive information (for example safeguarding concerns) is not added to the SIMS student record in this section. Confidential safeguarding information should be managed by the school with specialised software such as MyConcern. Unless the school wishes to Hide this section in their Manage Access panel, it is important to be aware that any medical notes already on SIMS for on-roll students will be visible to parents and the parent will need to confirm that they have seen this information.
GP Details – the name and address of the student’s medical practice. This information syncs into SIMS as a Medical Note.
SEN and Disability #
The S.E.N. tab in the student profile is designed to store and manage information related to students’ Special Educational Needs. In order for a condition to be entered into SIMS correctly, parents must upload supporting documentation confirming their child’s diagnosis. One of the checkboxes must be ticked in order to confirm this section of the Admicity Profile. After the sync has taken place, the integration settings will save these checkboxes as follows:
– Children with no SEN will import as code N on SIMS
– Children with an EHCP will import as Code E
– Children with a diagnosed S.E.N. condition or disability requiring additional classroom support will import as Code K.
The parent can only select a condition that appears in the school’s SEN lookup list in SIMS so that there can be no synchronisation errors. All supporting documentation uploaded by parents via Admicity will be synced as ‘Linked SEN document’ in SIMS. Unless the school wishes to Hide the S.E.N. section from parents in their Manage Access panel, it is important to be aware that any S.E.N. information already on SIMS for on-roll students will be visible to parents and the parent will need to confirm that they have seen this information.
Dietary and Welfare #
The Dietary and Welfare tab in the student profile is designed to manage information related to a student’s dietary needs, food allergies, eligibility for free school meals, and any welfare-related information relating to the child. The dietary lists shown to parents are those in the school’s own SIMS list so there will be no sync errors. The most sensitive welfare issues do not sync to SIMS but the Welfare Officer will be alerted to the parent entering this information and can choose whether or not it should be added. Only non-sensitive welfare information (e.g. service child in education / young carer) is automatically synced to SIMS.
Consent and Transport #
The Parental Consents and Transport tab in the student profile is designed to manage and document the various consents provided by parents or guardians for their child’s participation in school activities, use of digital media, and other permissions. It allows the parent to inform the school of their child’s intended or current mode of transport (depending on whether they are an on-roll student or an Accepted applicant). The Consents list and Transport list are the school’s own SIMS lookup lists so it is important that these are accurate and regularly maintained. All fields in these sections will sync into SIMS. Unless the section is hidden in the Manage Access panel, information already on SIMS for on-roll students will be visible to parents who can then update or confirm it as necessary.